
Latest update: 4/5/19
The biggest mistake novices make while attempting to shoot a hand gun is forgetting the basics. Most can tell you what they need to do, but when they pick up the gun, everything is forgotten. The challenge is to not only remember the mechanics, but to also concentrate at a level that other distractions, while mentally noted, are ignored, unless they are a threat or safety issue.
Many people can learn well, just by reading. Others do better with
pictures, while everyone does better with practice. For those
that find pictures helpful, Todd Jarret has an excellent video on
handgun basics at:
Let's address some of the mechanics, one subject at a time.
Similar to building a house, you must start with a good foundation. In shooting, the stance is your foundation. Improper stance/balance will hamper your ability to shoot well, which will make it less fun and less effective. The placement of your feet, weight distribution (or "center of gravity") will either help you shoot better, or make it very difficult to shoot well.
While on the subject of stance there is significant discussion or debate about Weaver vs Isosceles. Which should you use? The answer is "it depends". "WHAT?!" you say, "What do you mean it depends?" In simplest terms, what is the purpose of the shot? Is it to punch a hole in a piece of paper, is it to knock over a steel plate, are you moving, is the target moving, is the shot to defend yourself? ALL of those factors will dictate which is the most effective for that shot, at that time.
We must learn both Isosceles and Weaver stance and to transition seamlessly between the them. Which one we use and when, depends on the situation.
We will start descriptions with the Isosceles. Feet should be about shoulder width apart with your weight centered. Knees are slightly bent (not locked nor bent so you are in a crouch). Shoulders are slightly ahead of your hips to prepare you for recoil when you take a shot. This will put you on the balls of your feet, rather than flat footed, on your heels. Note that the elbows are slightly bent to absorb recoil and the head is straight and NOT pulled in to the shoulders nor leaning to one side. By not pulling your shoulders up you reduce the tension in your shoulders and aid the control of your shot. Remember, if the gun is too low to put the sights on your target, RAISE YOUR ARMS rather than lowering your head!
You can change from the Isosceles to the Weaver by simply moving the strong side (the one holding the gun) foot back eight to twelve inches and bending the weak side arm (support arm) to keep the gun pointed at your target. It is just that simple. Some people prefer to use what would be referred to as a "fighting stance", in martial arts. That is simply moving the back foot (strong side) further back and rotating the body more to the side. Your choice.
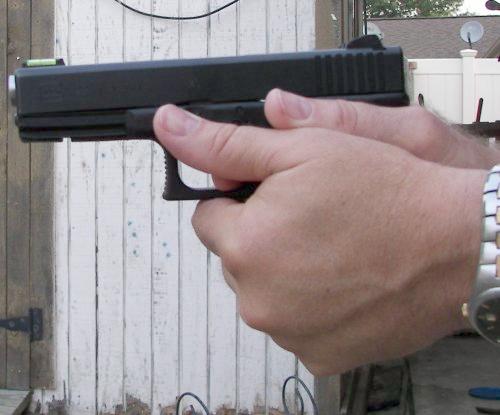
How consistently you grip your pistol WILL have perceptible influence on how consistently you shoot. Small variations in grip can produce large changes in point of impact for the bullet, thus it is important to learn how to properly grip the pistol.
At about 40 seconds into the Todd Jarret video there is excellent instruction on how to grip the pistol. Please review that material again.
To emphasize your grip encompassing the entire pistol grip, consider

One other thing that most seem not to know/understand is that when you reposition your grip in the midst of a shot string, you have just CHANGED the point of impact! Many will disagree with that statement, but it IS true. Is it a significant amount? No, but it IS there and for longer shots, can make a difference. Learn to take a firm and proper grip TO START WITH, then change it ONLY if there are extenuating circumstances that require it.
A revolver requires a bit different technique. Try Jerry Miculek on shooting a revolver for more information.
Another, more wordy explanation is. . . . .
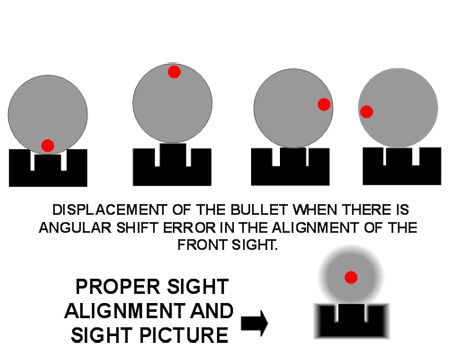
What is sight alignment vs sight picture? The sight alignment is the positioning of the sights, one to the other, such that the front sight is centered between the two "legs" of the rear sight AND the top of the front sight is visually the same height as the top of the rear sight, as shown in this diagram.

Sight picture (what the diagram actually is) has the correct sight alignment overlayed on the target, as shown.
Within sight picture there are TWO standard types of sight picture. The first (once again, shown in the diagram) is known as "center of mass" because the sights are pointing where you want to hit.Please note that while the diagram is titled "Perfect" Alignment, it is not perfect. The gun is rotated slightly counter clock-wise and the front sight is slightly to the left. Very importantly, the focus is on the rear sight (sharply in focus) rather than the front sight (grayed out). The front sight should be sharply in focus and the rear sight grayed out. With all that said, were you to get your sights aligned that well just as the gun fired, you would doubtless be very pleased with the result.
The second sight picture (shown below) is called 6 o'clock hold
because the front sight will will be pointing at the bottom of the
target and the sights adjusted so the bullet impact will still be in
the center of the target. The 6 o'clock hold is used by target shooters
to get a more precise hold on the vertical axis.
Once again, this is 6 o'clock hold.
Self Defense (SD) will almost always use the Center Of Mass (COM) hold.
Triggers will often take a lot of abuse. They get jerked, slapped, crushed or just beaten on, far too often. You can do almost everything else right, and still ruin the shot with even a slight amount of trigger abuse.
To minimize trigger abuse, start by placing the center of the pad between the first joint and the tip of the index finger on the center of the trigger. You will notice the difference in the two methods below. Many prefer to use method (a) for double-action revolvers, but most find method (b) far more accurate for pistols (semi-auto).
When you pull the trigger do not: yank on it, pull it abruptly, or push from the side. Instead apply a steadily increasing rearward pressure until the trigger releases the sear and the weapon is fired. This is also known as when the shot breaks. As you are doing this, make sure you do not have the base of the index finger move (reference the Todd Jarret video). To do this consistently requires practice, a lot of practice. The most cost effective, and also the easiest to learn with is "dry-firing", or cycling the action with a "snap cap" (a.k.a. dummy round) in the chamber.
Rob Leatham, another national pistol champion, has another way of presenting the importance of trigger control. His advice is best summarized as AIMING IS USELESS! which he then adds "until you can pull the trigger WITHOUT moving the gun! That is a different way of presenting just how important a smooth pull of the trigger, once again, without moving the gun, is!
There are two teaching aids that you can use. First and least expensive is to balance a coin on the end of the barrel/slide. If that coin falls, you are probably jerking the trigger. The second is to use a laser pointer attached to the barrel (rubber bands work for temporary use). You activate the laser and dry-fire. The laser doesn't have to line up with the sights. You are not aiming with it, but rather using it to indicate unwanted movement in the pistol as you fire. If the laser dot jumps as the pistol clicks, you are probably jerking or pushing rather than squeezing the trigger.
Some triggers have Over Travel. This means the shot breaks and the gun fires before the trigger has moved all the way back. This allows the trigger to jump that last distance and hit the frame, which can easily throw the shot off. Over Travel can sometimes be remedied by the user, but normally requires a Gun Smith to repair.
Once the gun has fired, hold the finger on the trigger in its rear most position for about a second. This is "follow-through". You will save yourself a lot of grief later in your shooting career if you develop consistent follow through.
Some/Most of us have what is sometimes referred to as training scars. A "Training Scar" is any Bad Habit you have picked up that needs to be worked out or "UN-learned". If you have Training Scars, the best thing to do is to get with someone that is more than a "week-end warrior", or "range expert". Your shooting buddy doesn't qualify. In fact you may have training scars from listening to one of those people. Find someone that has certification AND experience, REAL experience, far beyond a few matches.
The anticipation of Christmas morning can be a lot of fun. Anticipation in shooting is a bad thing. Don't anticipate Recoil. This tends to make you push against the recoil before it happens. That pushes the shot off target, FAR off target. Closely behind anticipation is flinch. Flinching is bad, because you can do all kinds of strange things including actually closing your eyes just before firing. How can you hit your target if you are not looking at it?
One cause of the flinch is the recoil. For many people recoil is negative, when in truth, recoil is your friend. It tells you that everything is working correctly. Learn to not just accept it as something you can not change, but rather as something that helps you shoot better. "HELP ME SHOOT BETTER?!" you say. Absolutely. It becomes part of your training. Presuming your stance is solid, your grip correct and firm, your sights properly aligned and you squeeze the trigger, rather than slap it, the recoil tells you that all is well in your shooting world. Simply stated, recoil is the "positive feedback" that a lot of people like to have.
An easy cure for flinch is to "dry fire", a LOT. How much is "a lot"? From Gabe Suarez' book on Tactical Pistol, he recommends eight to ten THOUSAND times. - - If you also use the low recoil .22lr for some of your training you can minimize or eliminate your flinch AND save quite a bit of money in lower ammunition costs. There can be quite a bit of really good training using the .22 rim-fire.
One last item is to remember that you are responsible for EVERY bullet that leaves your gun, until it comes to rest, where ever that ends up being. That is not just a moral obligation, it IS a legal liability. You will be held accountable for every bullet that leaves your gun. Make sure it gets to where you wanted it to go.
Just an example of something that is fine, with a pistol, but VERY dangerous with a revolver.
Have fun, shoot safe!